Ah, favours… tiny tokens of appreciation for the guests, and getting less and less traditional every year! If you want to do something unique, have a look at these five DIY wedding favours we love – and really anyone can do them! Which one do you fancy the most?
Cupcake in a jar
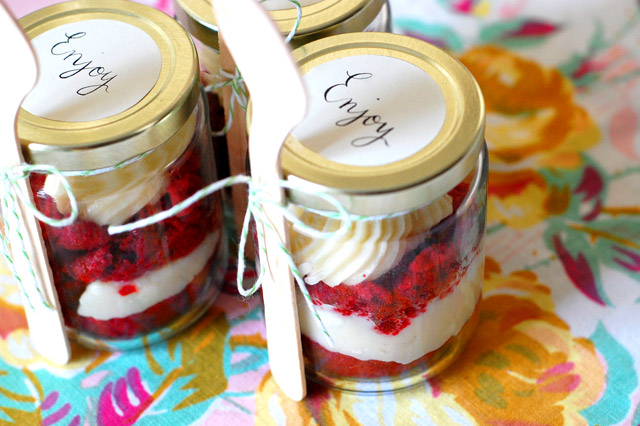
Image courtesy of Cakies
What you need: Cupcakes (home baked or pre-made in your favourite flavour), jars (buy in bulk, or if you start early enough, collect empty jars until you have as many as wedding guests), mini meringues (buy or make), sprinkles, chocolate chips, gummy bears, cookie crumbles (literally anything you’d like to add to your cupcakes), twine or ribbon, tags or stickers.
What to do: Think layers with a little décor on top. Cut each cupcake in half horizontally. Place half a cupcake at the bottom of the jar. The next layer is the meringue – crumbled into large pieces, or whole if it fits. The next layer is the second half of the cupcake. Then add more meringue – or you can add some fresh fruit for a little bit of colour. Top with sprinkles, or chocolate chips or cookie crumble. You’re done!
Close the lid tightly, wrap twine or ribbon around it, and either add a name tag/sticker to each one, or a tag with your names and wedding date on it. These can be done at home and written by hand.
Top tips: While you can purchase the non-perishable supplies well in advance (that would be your ribbon, twine, tag paper or stickers), the rest of the cupcakes will need to be as fresh as possible. Meringues and your toppings (sprinkles etc.) keep for a long time, so get these first. Store-bought cupcakes keep for up to a week in cool storage – get these as fresh as possible. The last thing to get is your fresh fruit, if you’re using any.
For best results, make these cupcakes the day before the wedding and take them to the venue if possible, or store at home. They are really quick to make, literally minutes per favour! The best thing about them is that they don’t have to be perfect – let the chocolate chips fall this way or that way, it doesn’t matter… everyone will love them!
Alternate version: Instead of meringue, try layering halves of cupcakes in different colours, for example, lemon and chocolate. If you’re baking them yourself, you can add food dye in any colour so that the jars fit your colour scheme! Yummy AND matching! Way to go!
Handmade CD cases

Image courtesy of twintrees shop on Etsy
What you need: Paper for the envelopes (think thicker than store-bought wrapping paper), any embellishments you like (funny stickers, buttons, ribbon, rhinestones), good glue, scissors, and of course – CDs!
What to do: Take a paper CD envelope from any CD you have, and tear open the tabs where the sides are glued. Lay flat on your paper – voilà, it’s your ready-made pattern! Now all you have to do is trace, cut, fold and glue – no measuring required. Once everything is dry, apply any embellishments to your liking, or if your paper is plain – write your message on it, or your names plus wedding date, or anything else you like.
Top tips: This project is perfect for couples who are giving away mixed CDs of their favourite songs, or blank CDs for guests to take home to upload their wedding photos. They easily double up as place cards by adding the guests’ names. If you don’t want them on the tables, you can also set them up in a gorgeous basket near the entrance of the reception, or even next to the sweet buffet.
Alternate version: Bulk-buy slim CD cases, then decorate as you wish – wrap with lace, add stickers or your engagement photo on top, or simply tie with a ribbon or three in your wedding colours.
Tiny knitted hearts favours
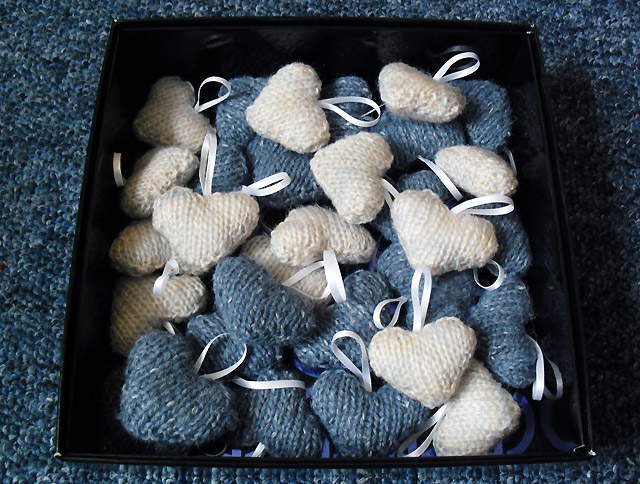
Image courtesy of Creative Thinkers blog
What you need: 4-ply yarn in your chosen colours, 3.5 (size 4) knitting needles, ribbon, buttons or name tags to decorate, stuffing. Also – you’ll need time, and possibly some keen knitting helpers for some fun evenings to remember!
What to do: You can either find your own mini-heart knitting pattern online, or go to Creative Thinkers blog, where you’ll find a link for the hearts you see above.
Top tips: As long as you give yourself plenty of time, knitted hearts make perfect favours. You can literally make them any time, store them anywhere, and if one goes wrong – you just unravel it and start over! Give your hearts a scent to remember by adding a little lavender or a few drops of essential oil to the stuffing.
Alternate version: Instead of making stuffed hearts, make them flat – to be used as cute coasters. You can still attach ribbons and tags for that extra personalised touch. It’ll be twice as fast as you’ll only need one per guest, not two.
Smarties… anything
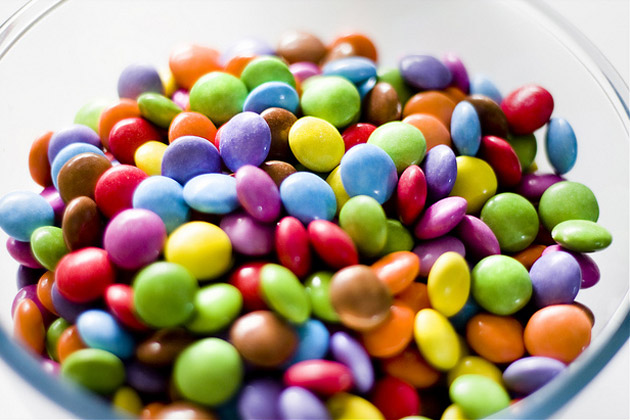
Image courtesy of James_bla on Flickr
What you need: Smarties! Or, any other sweets that come in a rainbow of colours: gummy bears, jelly beans, M&Ms, Skittles… so many choices! Bulk-buy to save a bundle. Anything you want to present them in – organza bags (the same ones you’d normally put sugared almonds in, but Smarties are so much more fun!), mini-jars, mini-pails, striped paper bags, or even confetti cones (you can make these yourself too). Any ribbons, tags, or decorations.
What to do: Put the Smarties inside a vessel of your choice. Add decorations. You’re done.
Top tips: Mind the storage – sweets are long-lasting, but still perishable, so anything chocolate-filled needs to be stored in a cool dry place. For extra fun, go that extra mile and separate the colours, then either place a variety on each table, or group them by colour, for example, one table gets all the blue ones, etc.
Alternate version: Instead of an individual serving for each place setting, place a sharing bowl on each table, and let the guests help themselves.
Coffee or tea wedding favours
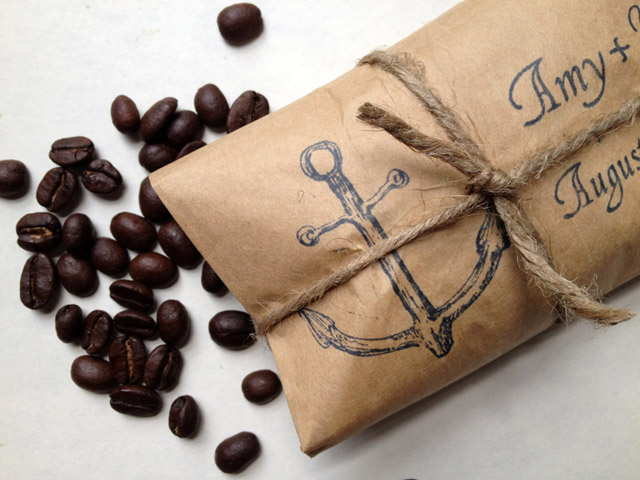
Image courtesy of Etsy
What you need: Coffee beans or tea bags (you can use loose leaf tea too, but bags are much easier to handle), mini cellophane bags, or little brown paper bags, twine or ribbon, name tags, optional craft store stamp as decoration.
What to do: If you’re doing any stamped personalisation, make sure you do a test-run on a spare bag. Stamps usually work only on paper bags, so if you have cellophane or organza, you can use stickers instead. Stamp and write everything first, then fill, close and add your decorations. To make a parcel like in the picture above, fold the top of a paper bag a quarter of the way down, then fold the bag in half, tucking the first folded quarter inside. Another lovely way of closing them is to roll the top of the bag down, then tie with ribbon to keep it from opening.
Top tips: If you’re writing anything on the bags, do it when they’re empty – it’s harder to write neatly when they’re filled. Coffee and tea are perfect as male-and-female favours, if you’re after something different for each set of guests.
Alternate version: Put the coffee in confetti cones, little jars, or organza bags in a colour of your choice. Organza bags are a lovely alternative, because guests expect to see the almonds, but instead they get a lovely coffee or tea surprise!